
Introduction
Silicone vacuum casting—also known as urethane casting or silicone mold casting—is one of the most widely used rapid manufacturing technologies for producing high-quality prototypes and low-volume plastic parts.
It is especially popular in industrial design validation, functional testing, pilot production, robotics components, consumer electronics casings, automotive interior parts, and medical device housings.
This process combines speed, precision, and cost-effectiveness, making it the perfect bridge between 3D printing prototypes and full-scale injection molding.
1. What Is Silicone Vacuum Casting?
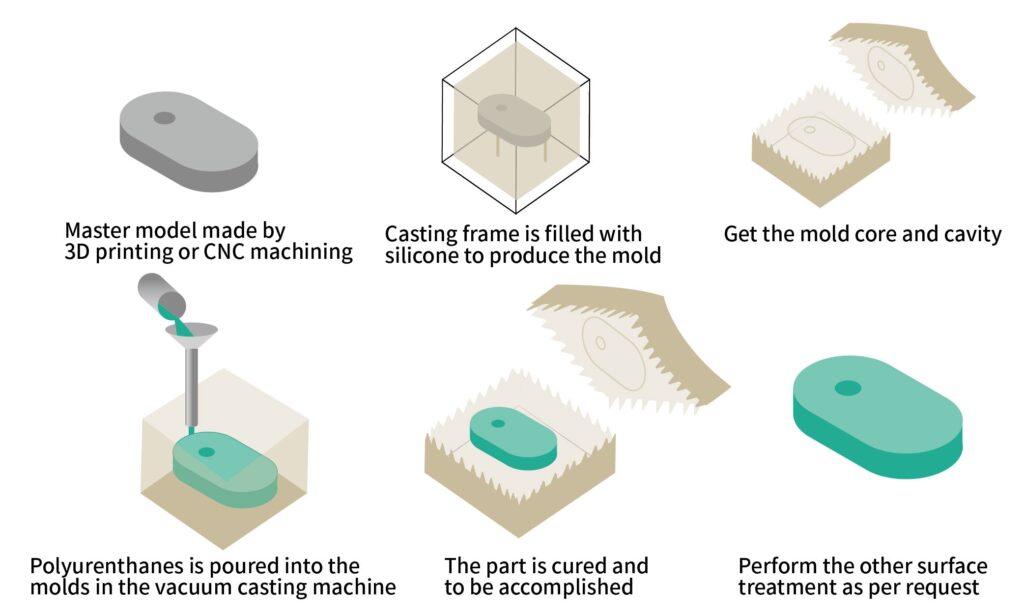
Silicone vacuum casting is a low-volume manufacturing process in which a master model—usually made by SLA/SLS 3D printing or CNC machining—is used to create a silicone mold.
Liquid polyurethane or other casting resins are then poured into the mold under vacuum, eliminating bubbles and ensuring a smooth, accurate part.
Typical Production Output
- One silicone mold: 15–25 castings
- Lead time: 1–3 days for mold, 1–2 days for casting batch
- Ideal order size: 5–200 pieces
2. Benefits of Silicone Vacuum Casting
2.1 High Level of Detail
Silicone molds capture surface textures with great precision:
- Smooth glossy surfaces
- Matte textures
- Fine engraving
- Snap-fit features
2.2 Wide Material & Color Options
Urethane resins can mimic:
- ABS
- PP / PE
- PC
- Rubber-like materials
- Transparent PMMA-like plastics
Colors can be blended into the resin or painted afterward.
2.3 Fast & Cost-Efficient
Unlike injection molding, vacuum casting:
- Does not require expensive steel tooling
- Achieves short lead time
- Fits low-volume manufacturing perfectly
2.4 Excellent Mechanical Properties
Depending on resin choice, vacuum-cast parts can be:
- Tough
- Flexible
- High-temperature resistant
- UV-stable
- Clear and optical-grade
3. Silicone Vacuum Casting Workflow
Step 1 – Create the Master Model
Master models are usually produced using:
- SLA 3D printing (high detail)
- SLS 3D printing (functional nylon model)
- CNC machining (for highest precision & durability)
The quality of the master directly determines the surface finish of the final parts.
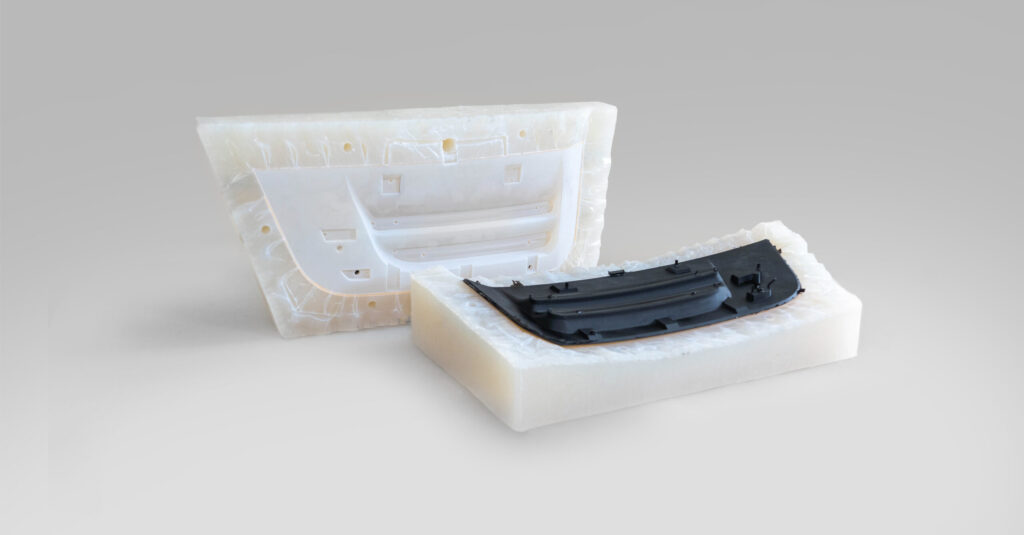
Step 2 – Build the Silicone Mold
The master model is placed inside a mold box and liquid silicone is poured around it.
After curing (8–16 hours), the mold is cut open along predetermined seam lines and the master is removed.
The cavity inside becomes the negative shape of the final part.
Step 3 – Vacuum Casting
The mold is placed inside a vacuum chamber.
Mixed polyurethane resin is poured into the cavity under vacuum to remove air bubbles.
After casting, the mold is placed in an oven for thermal curing.
Step 4 – Demolding & Finishing
Once cured, the part is removed from the mold.
Secondary processing options include:
- Sanding
- Painting
- Silk-screen printing
- Texture finishing
- UV coating
- Clear polishing (for transparent parts)
4. Materials Used in Vacuum Casting
| Material Type | Features | Applications |
|---|---|---|
| Rigid Polyurethane (ABS-like) | High strength, dimensionally stable | Structural housings, brackets |
| Flexible PU (Rubber-like) | 30A–90A shore hardness | Grips, gaskets, seals |
| Transparent Resin (PC/PMMA-like) | High clarity | Light covers, lenses |
| High-temperature PU | Heat resistance up to 120–150°C | Automotive components |
| PP-like PU | Excellent flexibility & impact resistance | Hinges, prototypes |
5. When Should You Choose Vacuum Casting?
✔ Low-volume production
For quantities between 5–200 pcs, vacuum casting is faster and cheaper than injection molding.
✔ Functional testing before mass production
Perfect for engineering verification and design validation.
✔ Appearance prototypes
High-quality surfaces allow for presentation-grade prototypes.
✔ Soft-touch or elastomeric components
Flexible PU options can simulate silicone or TPU.
✔ Transparent parts
Ideal for light guides and lenses.
6. Common Applications
- Robotics housings & structural test parts
- Consumer electronics enclosures (controllers, wearables, power banks)
- Automotive interior components
- Medical device casings
- Industrial machinery covers
- Marketing demo prototypes
- Pilot runs before tooling investment
7. Advantages vs. Other Manufacturing Processes
| Process | Strengths | Weaknesses |
|---|---|---|
| Vacuum Casting | Low cost, fast, excellent cosmetic finish | Not ideal for >200 pcs |
| Injection Molding | Best for mass production | High tooling cost & long lead time |
| 3D Printing | Ideal for complex geometries | Surface may require post-processing |
| CNC Machining | High precision | Higher cost for complex shapes |
8. Tips for Better Vacuum Casting Results
- Avoid extremely thin walls (<1 mm)
- Use radii instead of sharp corners
- Verify undercuts and demolding directions
- Incorporate draft angles when possible
- Approve the master model finish before molding
Conclusion
Silicone vacuum casting is a highly versatile and efficient manufacturing solution for high-quality prototypes and low-volume production.
Whether you’re testing a new design or producing functional parts before committing to injection molds, vacuum casting delivers outstanding accuracy, surface finish, and mechanical performance.
If your project requires fast turnaround and excellent cosmetic quality, vacuum casting is one of the most effective solutions available today.